
【Hugo】基础篇:个人博客搭建
旧时代的船,想要载新世界的梦
前言
2024年底,突然对游戏没了兴趣,在家里装了一台Homelab的机器后,开始广泛的对各种技术重新开始产生兴趣。在网上搜资料看到众多大佬自己的网站,找到了很多宝藏,心血来潮的有了自己建一个博客的想法。于是,拿出了被丢掉很多年的建站技能,和废弃很多年的域名,搭建了一个个人博客站,也就有了经典的博客第一篇文章就是搭建博客,meta-blog!
PS: 按以下教程无需域名也能搭建
阅读前请审视整体方案,需要会使用Github和命令行
- 建站工具: hugo
- 建站工具皮肤: PaperMod
- 源代码(原文档)托管平台: Github
- 站点部署: Github Pages
- CI/CD(持续集成/持续部署): Github Actions
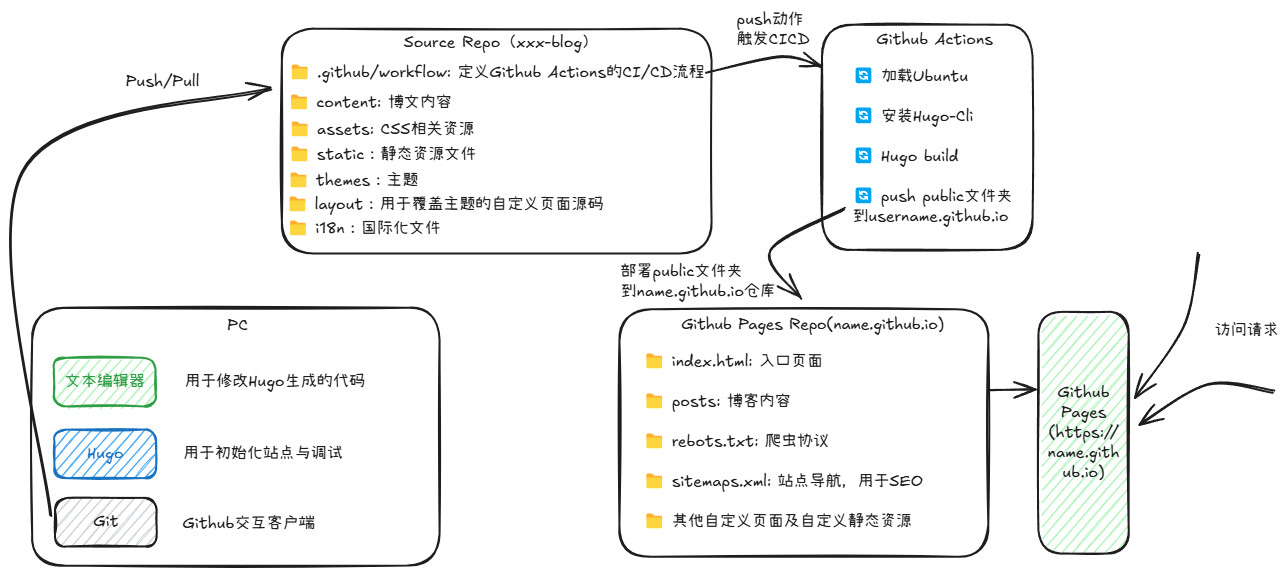
整体思路为,在Github中创建两个代码仓,一个用于管理源代码(博主的工作台,建议设置为Private),另一个用于部署静态站点(需要特殊命名,利用Github Pages托管),再利用Github Actions监听源代码仓变动后,自动更新Github Pages页面。
Hugo安装及配置
以下命令均由GitBash终端执行,如使用CMD或PowerShell可以自行替换对应命令
Hugo安装
Hugo的安装比较简单,go的编译产物基本都是一个二进制的可执行文件。从Github的Release页面下载对应操作系统的可执行文件即可。
我常用的工作、开发机操作系统均为Windows,则以Windows为例,下载 hugo的windows版本文件,将.exe文件解压到任意位置,如D:\sdk\hugo。打开环境变量配置,在PATH变量中新增D:\sdk\hugo 目录,使得命令行可以直接使用hugo.exe而不需要CD到指定目录(不会新增环境变量的,请自行百度)。
下载及配置完之后,打开命令行,输入hugo version 或 hugo.exe version进行验证,如输出版本号则代表安装成功。例如我的输出为:
$ hugo version
hugo v0.139.3-2f6864387cd31b975914e8373d4bf38bddbd47bc+extended+withdeploy windows/amd64 BuildDate=2024-11-29T15:36:56Z VendorInfo=gohugoio
创建站点
使用hugo命令 hugo new site $YOUR_SITE_NAME 来创建站点。该站点后续会被作为原文档仓库托管到Github进行管理
$ hugo new site zanks-blog
Congratulations! Your new Hugo site was created in D:\03_code\personal\zanks-blog.

Just a few more steps...

1. Change the current directory to D:\03_code\personal\zanks-blog.
2. Create or install a theme:
   - Create a new theme with the command "hugo new theme <THEMENAME>"
   - Or, install a theme from https://themes.gohugo.io/
3. Edit hugo.toml, setting the "theme" property to the theme name.
4. Create new content with the command "hugo new content <SECTIONNAME>\<FILENAME>.<FORMAT>".
5. Start the embedded web server with the command "hugo server --buildDrafts".

See documentation at https://gohugo.io/.命令输入完成后,会在当前目录下创建zanks-blog文件夹,这个文件夹会作为原文档仓库。使用tree命令(没有的也可以直接用ll)看一下hugo生成的目录,内容不多。
$ tree .
.
|-- archetypes
|   `-- default.md
|-- assets
|-- content
|-- data
|-- hugo.toml
|-- i18n
|-- layouts
|-- static
`-- themes

8 directories, 2 files
配置皮肤
在正式启动前,可以给站点安装一个自己喜欢的皮肤(如果不安装,直接进行下一步本地调试,会出现Page Not Found的错误,我已经试过了,不必再试)
我使用的皮肤是PaperMode
首先,使用git init将这个站点目录变为Git仓库,然后使用submodule命令获取皮肤,这边会从Github上下载东西,如果遇到网络问题,需要使用魔法手段解决。
这里稍微解释一下,submodule 是一个不太常见的Git命令,通常被用于管理Git仓库中的子模块(submodule)。子模块是指一个Git仓库作为另一个Git仓库的子目录。使用子模块,可以将一个项目嵌入到另一个项目中,同时保持两者的独立性。(AI告诉我的,其实我也不懂)
$ git init
Initialized empty Git repository in D:/03_code/personal/zanks-blog/.git/

$ git submodule add --depth=1 https://github.com/adityatelange/hugo-PaperMod.git themes/PaperMod
Cloning into 'D:/03_code/personal/zanks-blog/themes/PaperMod'...
remote: Enumerating objects: 139, done.
remote: Counting objects: 100% (139/139), done.
remote: Compressing objects: 100% (98/98), done.
remote: Total 139 (delta 36), reused 121 (delta 36), pack-reused 0 (from 0)
Receiving objects: 100% (139/139), 249.18 KiB | 5.08 MiB/s, done.
Resolving deltas: 100% (36/36), done.
warning: in the working copy of '.gitmodules', LF will be replaced by CRLF the next time Git touches it
根据PaperMod的官方建议,使用yaml替换toml作为配置文件。安装主题后,备份hugo.toml文件,新增hugo.yml并添加以下内容,其中title可以随意替换为自己喜欢的。
baseUrl: https://example.org/
languageCode: zh-cn
title: 乱话三千
theme: PaperMod
以上配置只能保证站点可以启动,下文中将给出更多高阶配置,需要理解并筛选和更改为适用于自己站点的配置项(当然你直接照抄也是可以的)
baseUrl: https://example.org/
languageCode: zh-cn # en-us
title: 乱话三千
theme: PaperMod


enableRobotsTXT: true # 允许爬虫协议
enableEmoji: true # 允许使用Emoji表情
buildDrafts: false
buildFuture: false
buildExpired: false


params:
  profileMode:
    enabled: true
    subtitle: "记载着某个人的胡言乱语"
    imageUrl: "/homepage.jpg" # optional
    imageWidth: 150 # custom size
    imageHeight: 150 # custom size
    buttons:
      - name: 点击开始
        url: "/posts"

menu:
  main:
    - identifier: post
      name: 文章
      url: /posts/
      weight: 10
    - identifier: tags
      name: 标签
      url: /tags/
      weight: 20
    - identifier: about
      name: 关于
      url: /about/
      weight: 30
这份配置使用了ProfileMode,在首页配置了一个图标和一个按钮,按钮将链接到 /posts 路径。并且在右上角的菜单中添加了三个按钮,分别连接到对应的路径,其中weight表示排序权重,数字越小按钮越靠近左侧。
创建文章
使用 hugo new $YOUR_ARTICAL命令来创建文章
$ hugo new posts/test.md
Content "D:\\03_code\\personal\\zanks-blog\\content\\posts\\test.md" created该命令在content/posts目录下创建了test.md文件,可以再使用 tree content命令或者 ll content 查看
$ tree content/
content/
|-- posts
|   `-- test.md
`-- posts.md

1 directory, 2 files然后再使用cat命令查看自动生成的文件中有什么内容
$ cat content/posts/test.md
+++
date = '2024-12-09T09:25:05+08:00'
draft = true
title = 'Test'
+++其中date、titile很好理解,分别为日期和文章的标题。draft 这个查阅了一下官网的解释,大致的意思为表示当前的文章为草案,在构建时除非人为添加参数指定,否则不会打包到最后的静态文件中。以下是官网的原文解释:
draft:
(`bool`) If `true`, the page will not be rendered unless you pass the `--buildDrafts` flag to the `hugo` command. Access this value from a template using the [`Draft`](https://gohugo.io/methods/page/draft/) method on a `Page` object.然后,给文件中,添加一些内容。这里不需要修改draft,后续在编译中可以通过参数指定查看到草稿内容。但生产环境需要发布时,将draft的值改为false
$ cat content/test.md
+++
date = '2024-12-09T09:25:05+08:00'
draft = true
title = 'Test'
+++

这是一篇测试文章
本地调试
本地调试是hugo提供的非常方便的工具,可以让我们在正式发布前看到站点的样子。只需要执行 hugo server 或 hugo serve 即可在本地启动服务端(在调试时可以添加-D参数看到草稿中的文章)。以下是我进行尝试的输出。
$ hugo serve -D
Watching for changes in D:\03_code\personal\zanks-blog\{archetypes,assets,content,data,i18n,layouts,static,themes}
Watching for config changes in D:\03_code\personal\zanks-blog\hugo.yml
Start building sites …
hugo v0.139.3-2f6864387cd31b975914e8373d4bf38bddbd47bc+extended+withdeploy windows/amd64 BuildDate=2024-11-29T15:36:56Z VendorInfo=gohugoio


                   | EN
-------------------+-----
  Pages            | 11
  Paginator pages  |  0
  Non-page files   |  0
  Static files     |  1
  Processed images |  0
  Aliases          |  0
  Cleaned          |  0

Built in 64 ms
Environment: "development"
Serving pages from disk
Running in Fast Render Mode. For full rebuilds on change: hugo server --disableFastRender
Web Server is available at http://localhost:1313/ (bind address 127.0.0.1)
Press Ctrl+C to stop
启动后,终端输出了服务器地址,使用浏览器进入就可以预览站点部署后的样子了。不出意外的话,可以看到创建的测文章。
配置文章模板
在archetypes目录下备份并修改default.md文件来修改新增文章的模板,以下是我根据官方模板进行修改的模板
---
title: "{{ replace .File.ContentBaseName "-" " " | title }}"
date: 2020-09-15T11:30:03+00:00
tags: [""]
author: "Zanks"
draft: true # 默认为草稿模式


weight:  #可以用于置顶
showToc: true # 显示目录
TocOpen: false # 打开目录
comments: false # 评论
description: ""
searchHidden: false # 优化SEO
ShowReadingTime: true
ShowWordCount: true
cover:
---
添加About页面
前面已经配置了About的链接,但是在访问时会出现404,下文中将会配置这个页面。
依然是使用hugo new 命令来创建md文件
$ hugo new about.md
Content "D:\\03_code\\personal\\zanks-blog\\content\\about.md" created
在其中添加一些介绍自己的内容,然后进入页面,点击关于就可以看到新增加到内容了(在发布时,记得将draft更改为false)
我尝试直接在content目录下创建 about.md 文件,在调试环境中可以看到这个页面,但是实际发布后却没有在public目录找到对应文件,暂时没有找到解决方案。删除并配置了文章模板后,通过命令创建about.md后可以正常工作。
源代码仓管理
本地仓初始化
- 执行
git init命令来初始化目录为git仓
$ git init
Initialized empty Git repository in D:/03_code/personal/zanks-blog/.git/- 添加一个.gitignore文件,将public文件夹取消跟踪,该仓将作为源代码仓进行管理,所以构建产物不需要加入跟踪。并将该文件commit(建议通过VSCode等带有图形化管理的操作)
$ cat .gitignore
/public- 为每个空的目录添加.gitkeep文件,来保证源代码仓的完整目录结构(asset、data、i18n、layouts),提交所有改动文件。
完成以上动作之后,本地仓构建完成。后面将在Github上创建代码仓,与该本地仓进行关联。
Github代码仓创建
在Github上创建一个空代码仓,使用命令进行关联。在Github页面上会有提示如何关联已有仓库,根据给出的命令直接复制到终端执行即可。
$ git remote add origin git@github.com:ZaNksC/zanks-blog.git
git branch -M main
git push -u origin main
Enumerating objects: 165, done.
Counting objects: 100% (165/165), done.
Delta compression using up to 12 threads
Compressing objects: 100% (148/148), done.
Writing objects: 100% (165/165), 274.80 KiB | 1.01 MiB/s, done.
Total 165 (delta 36), reused 0 (delta 0), pack-reused 0
remote: Resolving deltas: 100% (36/36), done.
To github.com:ZaNksC/zanks-blog.git
 * [new branch]      main -> main
branch 'main' set up to track 'origin/main'
登录Github就可以看到该代码仓中已经有内容了。
完成这一步后,就可以在任何装有Git和Hugo的机器上对博客进行开发了。
自动化部署
Github Pages托管
使用Github Pages进行静态站点托管,需要在Github中创建一个名为 username.github.io的特殊项目。
创建之后,就可以用 https://username.github.io 作为域名直接访问了,当然现在这里是一个空项目,访问之后会出现404。
Github Action自动化部署
Github的Action是一套标准的CI/CD系统,通过内置在源代码仓中.github/workflow目录下的yaml文件来定义流水线的动作。以下是我从Github Workflow的hugo流水线模板修改来的CICD一体化流水线。
$ cat .github/workflows/hugo.yml
# Sample workflow for building and deploying a Hugo site to GitHub Pages
name: Deploy Hugo site to Pages

on:
  # Runs on pushes targeting the default branch
  push:
    branches: ["main"]

  # Allows you to run this workflow manually from the Actions tab
  workflow_dispatch:

# Sets permissions of the GITHUB_TOKEN to allow deployment to GitHub Pages
permissions:
  contents: read
  pages: write
  id-token: write

# Allow only one concurrent deployment, skipping runs queued between the run in-progress and latest queued.
# However, do NOT cancel in-progress runs as we want to allow these production deployments to complete.
concurrency:
  group: "pages"
  cancel-in-progress: false

# Default to bash
defaults:
  run:
    shell: bash

jobs:
  # Build job
  build:
    runs-on: ubuntu-latest
    env:
      HUGO_VERSION: 0.139.3
    steps:
      - name: Install Hugo CLI
        run: |
          wget -O ${{ runner.temp }}/hugo.deb https://github.com/gohugoio/hugo/releases/download/v${HUGO_VERSION}/hugo_extended_${HUGO_VERSION}_linux-amd64.deb \
          && sudo dpkg -i ${{ runner.temp }}/hugo.deb
      - name: Install Dart Sass
        run: sudo snap install dart-sass
      - name: Checkout
        uses: actions/checkout@v4
        with:
          submodules: recursive
      - name: Install Node.js dependencies
        run: "[[ -f package-lock.json || -f npm-shrinkwrap.json ]] && npm ci || true"
      - name: Build with Hugo
        env:
          HUGO_CACHEDIR: ${{ runner.temp }}/hugo_cache
          HUGO_ENVIRONMENT: production
        run:
          hugo --baseURL=https://zanksc.github.io
      - name: Deploy Pages
        uses: peaceiris/actions-gh-pages@v3
        with:
            PERSONAL_TOKEN: ${{ secrets.PERSONAL_TOKEN }}
            EXTERNAL_REPOSITORY: ZaNksC/ZaNksC.github.io
            PUBLISH_BRANCH: main
            PUBLISH_DIR: ./public
            commit_message: ${{ github.event.head_commit.message }}
需要自行修改 Build With Hugo 步骤中的构建命令,baseURL替换为自己的博客地址,Deploy Pages步骤中的EXTERNAL_REPOSITORY变量,需要替换为自己的GitPage地址。
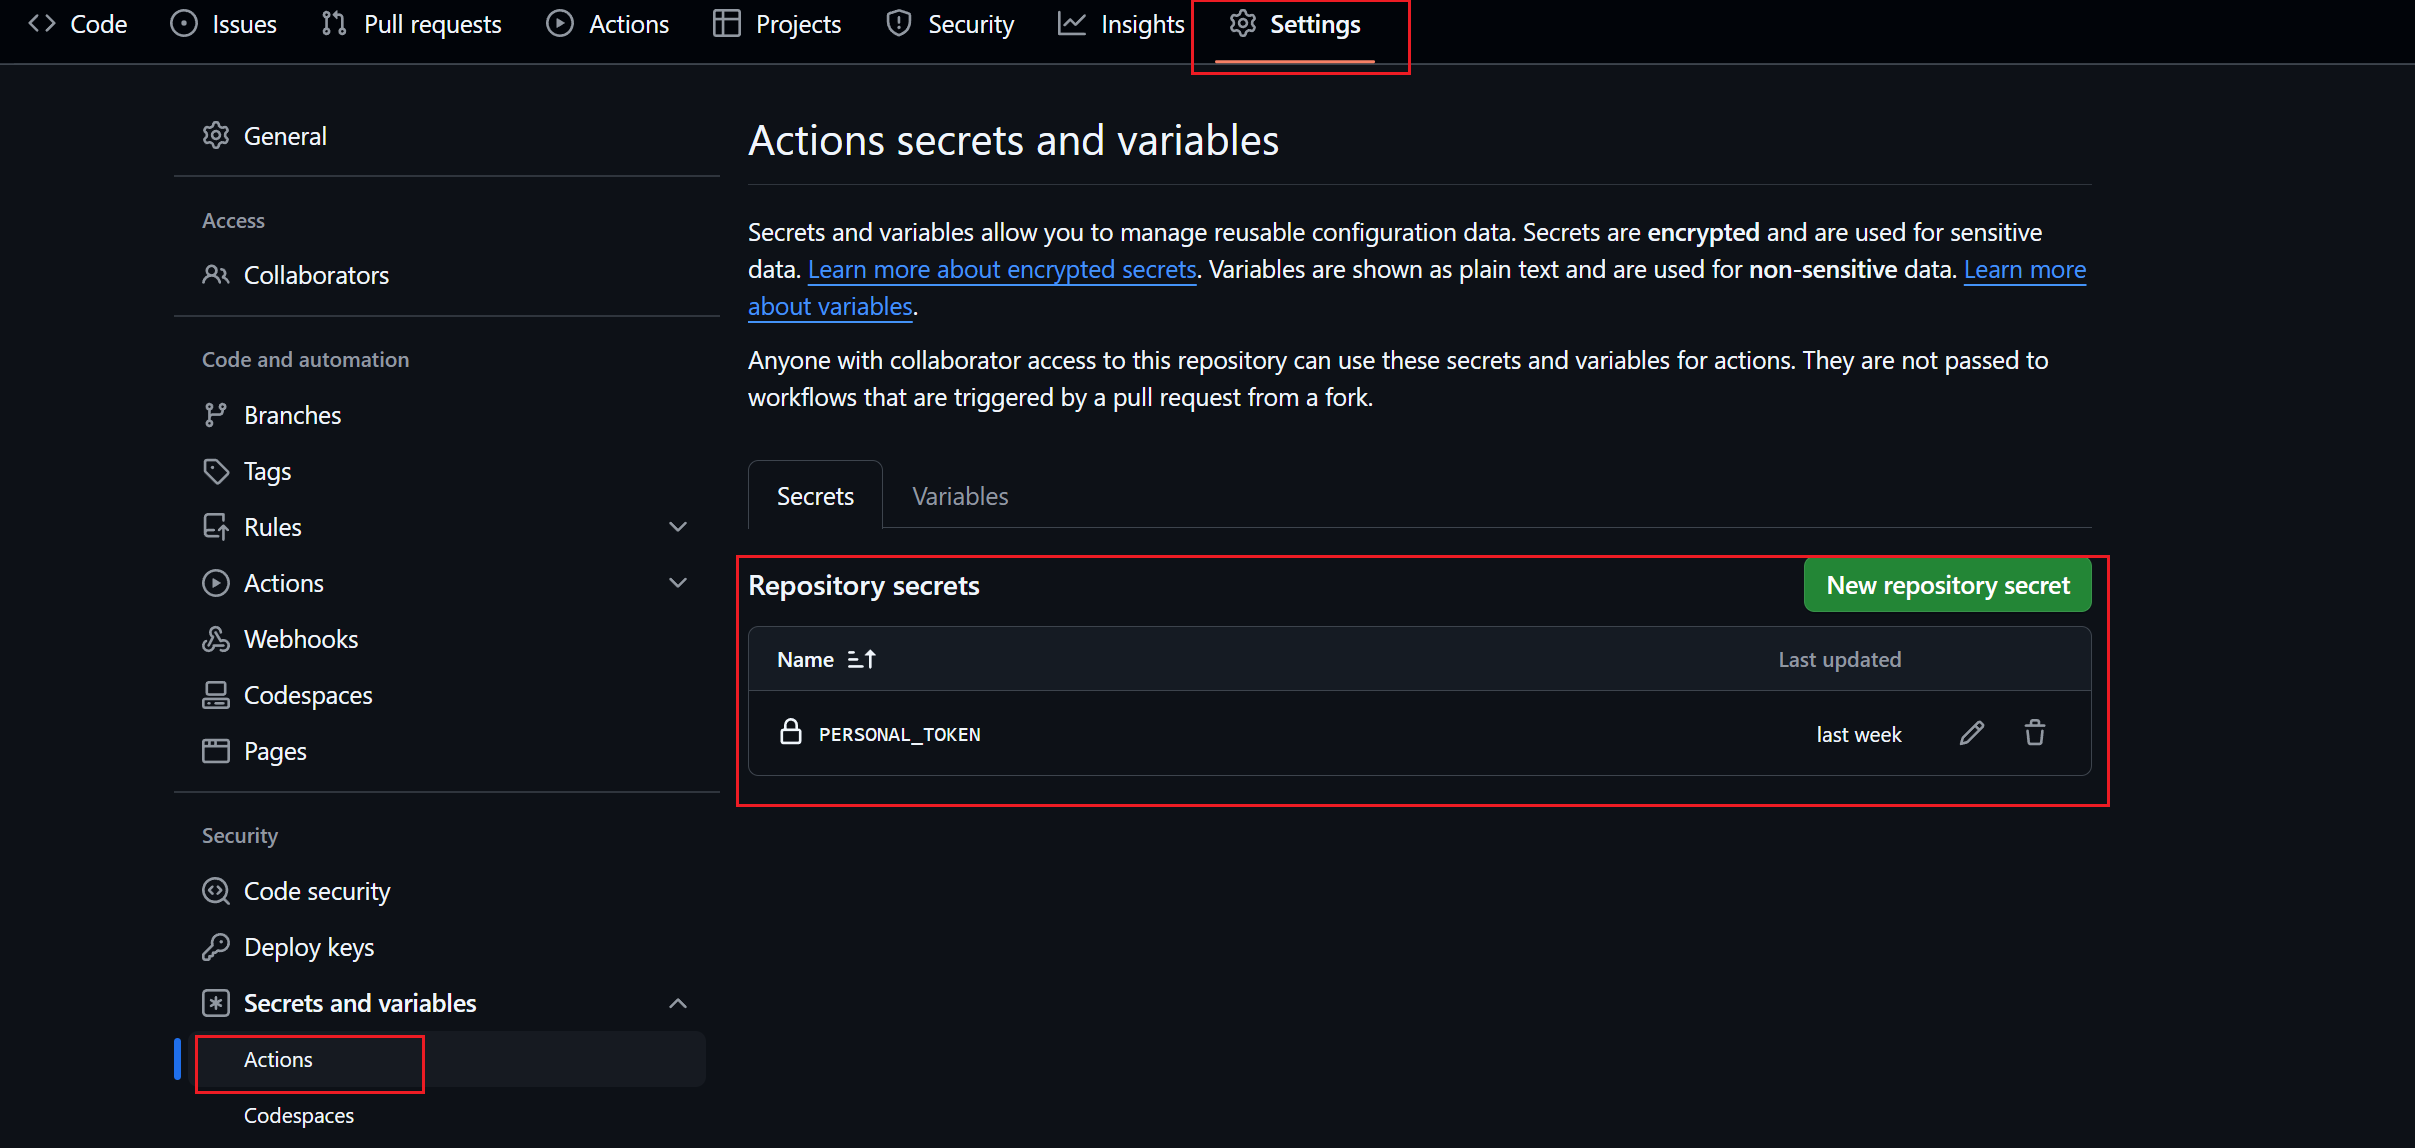
需要注意的是,在最后一个步骤Deploy Pages中,有${{ secrets.PERSONAL_TOKEN }}变量,这个变量位于源代码仓-settings-Secrete And variables-Action中。需要在这个目录中创建一个名为PERSONAL_TOKEN的变量。
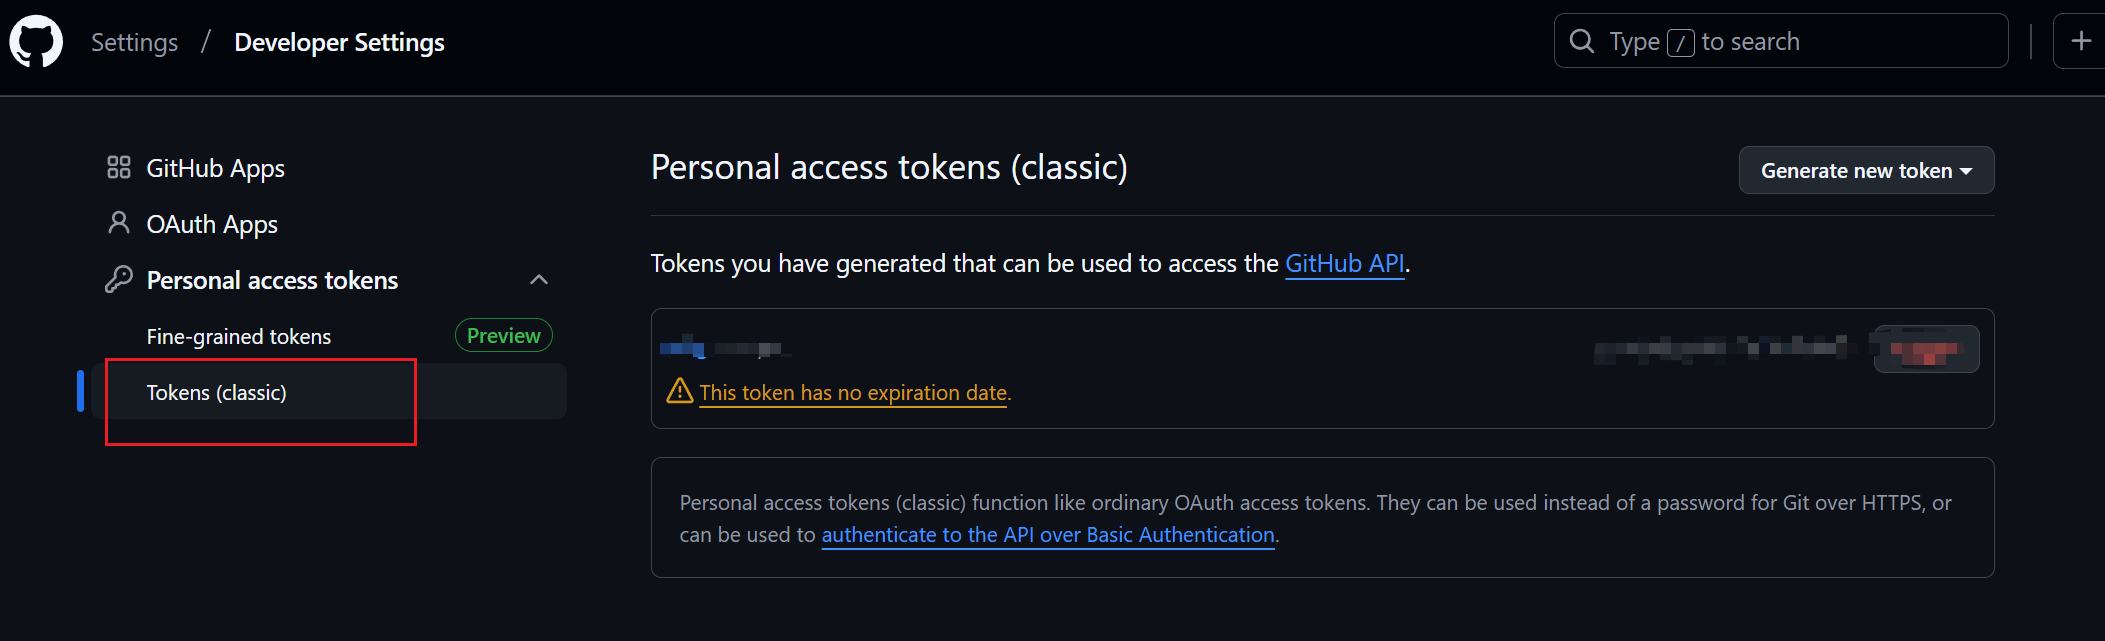
 变量的值则需要在Github(点击头像) - settings-Deploy Settings-Personal access tokens中创建,创建一个经典(classic)的Token,赋予 repo 的所有权限保证可以读写仓库。复制该Token的值(只会出现一次),填入上文提到的
PERSONAL_TOKEN的变量中。
变量的值则需要在Github(点击头像) - settings-Deploy Settings-Personal access tokens中创建,创建一个经典(classic)的Token,赋予 repo 的所有权限保证可以读写仓库。复制该Token的值(只会出现一次),填入上文提到的
PERSONAL_TOKEN的变量中。
在全部配置完成之后,可以通过 hugo new posts/test.md 输入一些内容并将draft值改为true,输入 git add . && git commit -m "add test.md" 进行提交,然后等待一段时间后,访问 https://name.github.io 查看博客中是否出现该文章来进行全流程验证。
参考资料
文章标题:【Hugo】基础篇:个人博客搭建
作者:
文章链接:https://www.zanks.link/post/coding-hugo-1-zanks
许可协议:CC BY-NC-ND 4.0
本作品采用知识共享署名 - 非商业性使用 - 禁止演绎 4.0 国际许可协议进行许可。您可以自由复制、分发本作品,但必须标明原作者,不得用于商业目的,且不得修改原作品。